225g prop tank build.....
Posted: Tue Dec 08, 2009 10:24 pm
So I have undertaken a 225g prop tank project. Dims are 96x36x15 - acrylic of course. I'll be running a 75 gallon sump, GEO kalk and calcium reactors, BRS GFO/Carbon dual reactor, 2 - Iwaki md30RLTs (one for return with a SCWD and one for closed loop with SCWD), 2 - VorTech MP40w's, RK2 controller, DIY ATO with relays, DIY gang boxes used with American DJ power strips, filter sock mount and 7" 200 micron socks, etc.
---The biggest DIY is the LED setup I'm going to build for this beast. A cost/benefit analysis has proven time and time again that LEDs are the way to go. With this setup, I'll eliminate the need for a chiller, $300 a year in bulbs if I replace them every 6 months, not to mention the power savings from the LEDs themselves and not having to run a chiller. This system is designed to light the tank in halves -- one half will house clams and SPS and the other will be for softies, zoas, LPS, etc. There will be a total of 168 Cree XR-E Star Q4s that run a mix of 1:1 (cool white: royal blue) to give a nice 14,000K look. They will be driven by 14 Mean Well ELN-60-48P dimmable drivers pushing the bulbs at 1000 mA. I'm in the process of consulting several people on the next element of this setup: an Arduino that controls the dimming functions to simulate sunrise/sunset/cloud cover/ thunderstorms. I'll have to wire my own LM317 circuits to convert 12v DC power supplies to a 10v input for PWM (pulse wave modulation) for dimming outputs. The Arduino will have a GUI (graphical user interface) via basic LCD and hopefully have buttons or toggles to modify lighting schedules on the fly. This will also require an RTC (real time clock) unit for accurate timekeeping and to counteract any shift occurring. I'd like to hang this setup 16" from the water surface via ceiling joists and will fab an acrylic housing which will be glazed and provide a nice cool blue glow once the light is powered on. Heatsinks and fans will be standard. ***IF ANYONE HAS A WORKING KNOWLEDGE OF OPEN-SOURCE PROGRAMMING AND GENERAL ELECTRONICS PLEASE CONTACT ME.
Here's a terrible pic from my iPhone:
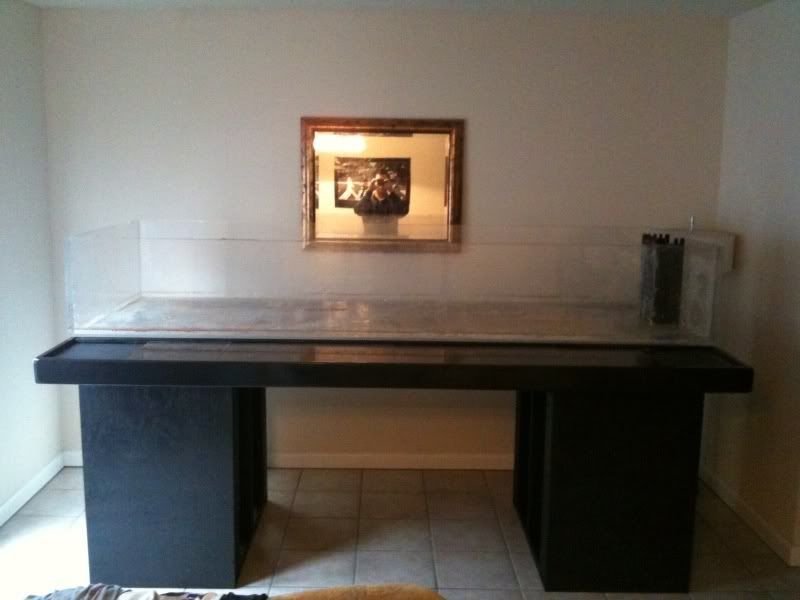
The stand has a 1' lip on the front where we laid black granite tile as a work surface. The stand consists of to 3'x2' pedestals that have plywood facades/bracing, an 8'x4' frame with 6 crossbraces (all 2x4's) with plywood to support tank, and we've run (3) 8' 2x4's on end from pedestal to pedestal as support runners (this thing is rock solid).
I'll be reworking the acrylic inside and out tomorrow with a Novus 3-step system. Pending procuring pumps tomorrow, I'll also be running the plumbing.
Frag racks on the softy/LPS/zoa side will be black eggcrate suspended on PVC (3 levels of varying/increasing height). On the SPS/clam side, I'm going to drill 3/4" pockets in the LR for frag plugs to sit in. I plan on constructing "islands" of LR by drilling the center 3/4", running PVC pipe through the holes in the center, and epoxying the rocks together. Then, bridges will be laid accordingly. I made the noob mistake when setting up my 90g of just doing a centered shelf of LR and have grown dissatisfied with it. The clams will sit on a slab of LR at least 3" thick. A 2" sand bed will also be utilized. With this sort of placement, I'm able to achieve the PAR values needed to support the planned livestock.
Planned livestock (fish): Achilles Tang, Chevron Tang, Magnificent Foxface, semi-picasso clowns, (wish a melanurus wrasse wouldn't jump), mandarins, etc.
***That's where I stand as of right now. There is no water, LR, LS or anything of the sort in the tank right now until the surfaces are reworked. I'm still in need of LR and LS so if anyone has any please, please, please LMK. I'm also in need of a 3/4" diamond hole brill bit to drill the sump for the return and 3/4" hole saw bits (regular) to drill the acrylic for the closed loop intake and returns.
=======I'll be selling my equipment from my 90g soon (all high-end stuff) so if you are in need please PM me. I also have a lot of coral I need to move.
Hopefully my 7 months of experience in reefing can see me through this.....
---The biggest DIY is the LED setup I'm going to build for this beast. A cost/benefit analysis has proven time and time again that LEDs are the way to go. With this setup, I'll eliminate the need for a chiller, $300 a year in bulbs if I replace them every 6 months, not to mention the power savings from the LEDs themselves and not having to run a chiller. This system is designed to light the tank in halves -- one half will house clams and SPS and the other will be for softies, zoas, LPS, etc. There will be a total of 168 Cree XR-E Star Q4s that run a mix of 1:1 (cool white: royal blue) to give a nice 14,000K look. They will be driven by 14 Mean Well ELN-60-48P dimmable drivers pushing the bulbs at 1000 mA. I'm in the process of consulting several people on the next element of this setup: an Arduino that controls the dimming functions to simulate sunrise/sunset/cloud cover/ thunderstorms. I'll have to wire my own LM317 circuits to convert 12v DC power supplies to a 10v input for PWM (pulse wave modulation) for dimming outputs. The Arduino will have a GUI (graphical user interface) via basic LCD and hopefully have buttons or toggles to modify lighting schedules on the fly. This will also require an RTC (real time clock) unit for accurate timekeeping and to counteract any shift occurring. I'd like to hang this setup 16" from the water surface via ceiling joists and will fab an acrylic housing which will be glazed and provide a nice cool blue glow once the light is powered on. Heatsinks and fans will be standard. ***IF ANYONE HAS A WORKING KNOWLEDGE OF OPEN-SOURCE PROGRAMMING AND GENERAL ELECTRONICS PLEASE CONTACT ME.
Here's a terrible pic from my iPhone:
The stand has a 1' lip on the front where we laid black granite tile as a work surface. The stand consists of to 3'x2' pedestals that have plywood facades/bracing, an 8'x4' frame with 6 crossbraces (all 2x4's) with plywood to support tank, and we've run (3) 8' 2x4's on end from pedestal to pedestal as support runners (this thing is rock solid).
I'll be reworking the acrylic inside and out tomorrow with a Novus 3-step system. Pending procuring pumps tomorrow, I'll also be running the plumbing.
Frag racks on the softy/LPS/zoa side will be black eggcrate suspended on PVC (3 levels of varying/increasing height). On the SPS/clam side, I'm going to drill 3/4" pockets in the LR for frag plugs to sit in. I plan on constructing "islands" of LR by drilling the center 3/4", running PVC pipe through the holes in the center, and epoxying the rocks together. Then, bridges will be laid accordingly. I made the noob mistake when setting up my 90g of just doing a centered shelf of LR and have grown dissatisfied with it. The clams will sit on a slab of LR at least 3" thick. A 2" sand bed will also be utilized. With this sort of placement, I'm able to achieve the PAR values needed to support the planned livestock.
Planned livestock (fish): Achilles Tang, Chevron Tang, Magnificent Foxface, semi-picasso clowns, (wish a melanurus wrasse wouldn't jump), mandarins, etc.
***That's where I stand as of right now. There is no water, LR, LS or anything of the sort in the tank right now until the surfaces are reworked. I'm still in need of LR and LS so if anyone has any please, please, please LMK. I'm also in need of a 3/4" diamond hole brill bit to drill the sump for the return and 3/4" hole saw bits (regular) to drill the acrylic for the closed loop intake and returns.
=======I'll be selling my equipment from my 90g soon (all high-end stuff) so if you are in need please PM me. I also have a lot of coral I need to move.
Hopefully my 7 months of experience in reefing can see me through this.....